Phase Converter Support Center

Lifetime technical support

Get your phase converter running—fast.

Start with the issue you are seeing, follow a clear written checklist, or send our Phoenix team photos for hands-on support.

Real Phoenix technicians Made in the USA Mon–Fri, 7AM–5PM MST
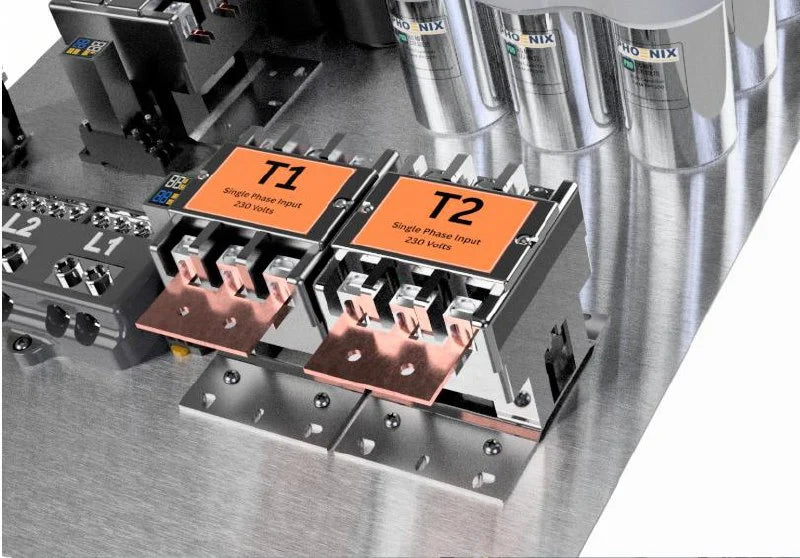
Phoenix phase converter control panel components on a workshop bench
Built for serviceabilityA real Phoenix control panel, shown before enclosure assembly.
Phoenix rotary phase converter control panel and idler motor

Fastest support path

Send the details once. Get the right technician faster.

The support app works best from your phone so you can attach clear photos while standing near the equipment.

  1. 1Choose troubleshooting, order support, sizing, or another request type.
  2. 2Add the converter model, machine nameplate, symptoms, and clear wiring photos.
  3. 3Submit the case and continue with the Phoenix support team.
Open Support Center App →

Written troubleshooting

Open a guide and work through it step by step.

The full instructions stay on this page—no videos, popups, or outside links.

!
Electrical safety comes first.

Turn off and lock out power before touching wiring. Installation and live-voltage testing must be completed by a qualified electrician.

Phase converter troubleshootingGeneral checks for common startup issues.
  1. Turn off and lock out power before opening a panel or touching any wiring.
  2. Disconnect the machine load so the converter can be tested by itself.
  3. Check the converter, machine, breaker, and wire sizing against the Phoenix manual and equipment nameplates.
  4. Have a qualified person confirm single-phase input voltage from L1 to L2.
  5. Start the converter with no load and note whether it clicks, hums, starts normally, or trips the breaker.
  6. If it starts, have a qualified person record L1-L2, L1-L3, and L2-L3 output voltages before reconnecting the machine.
  7. Contact Phoenix with the readings, model number, and photos if it does not start or readings are abnormal.
Not starting or hummingCheck common causes without bypassing safeguards.
  1. Turn off and lock out power, then disconnect the machine load.
  2. Confirm the idler motor shaft turns freely by hand only while all power is off.
  3. Inspect for loose, damaged, or incorrectly landed conductors and compare them with the supplied diagram.
  4. Confirm the source breaker and wire size meet the manual requirements.
  5. Have a qualified person verify incoming L1-to-L2 voltage during a no-load start attempt.
  6. Do not repeatedly cycle a humming motor. Turn it off if it does not accelerate normally.
  7. Contact Phoenix with the model, voltage, symptoms, and photos. Do not bypass the contactor or protection devices.
Checking the contactorIdentify contactor behavior during startup.
  1. Turn off and lock out power before removing the panel cover.
  2. Inspect the contactor for loose wires, discoloration, burned areas, or physical damage.
  3. Replace the cover or maintain safe working clearance before restoring power.
  4. From a safe position, start the converter and listen for one firm contactor click.
  5. Note whether it pulls in, chatters, drops out, or remains silent. Never touch energized components.
  6. Turn power off and send Phoenix the converter model, observations, and photos.
New installation checksVerify the installation before connecting a machine.
  1. Keep the machine disconnected and turn off and lock out all power.
  2. Compare every input, idler, ground, and output connection with the exact model diagram.
  3. Verify service, breaker, and conductor sizes meet the installation manual.
  4. Confirm converter and machine voltages match, including transformer configuration when used.
  5. Start the converter by itself and confirm the idler reaches full speed without humming or tripping.
  6. Have a qualified person record all three output line-to-line voltages.
  7. Turn power off, connect one machine, and test rotation. Swap any two output phases with power locked out if rotation is wrong.
9-wire motor connectionCommon 230V three-phase motor reference.

230V reference only. The motor nameplate diagram is authoritative. Stop if it differs.

  1. Turn off, lock out, and verify all power is absent.
  2. Identify and label motor leads T1 through T9.
  3. Connect T1 and T7 to L1.
  4. Connect T2 and T8 to L2.
  5. Connect T3 and T9 to L3.
  6. Join T4, T5, and T6 with a properly rated permanent connector; do not use household wire nuts.
  7. Insulate and enclose every connection, then test rotation. Swap any two phases with power locked out if needed.
12-wire motor connectionCommon 230V three-phase motor reference.

230V reference only. The motor nameplate diagram is authoritative. Stop if it differs.

  1. Turn off, lock out, and verify all power is absent.
  2. Identify and label motor leads T1 through T12.
  3. Connect T1, T6, T7, and T12 to L1.
  4. Connect T2, T4, T8, and T10 to L2.
  5. Connect T3, T5, T9, and T11 to L3.
  6. Use properly rated permanent connectors; do not use household wire nuts.
  7. Insulate and enclose every connection, then test rotation. Swap any two phases with power locked out if needed.
Phoenix AutoStart phase converter panel and idler motor in a workshop

Before you contact support

Five photos can save a round of questions.

Use bright, in-focus photos and keep each label readable.

  • Converter model and serial label
  • Full control panel with wiring visible
  • Input, idler, and output terminal connections
  • Machine motor nameplate and wiring diagram
  • Breaker information or any fault display

Still need a hand?

Call the shop or send your photos through the support app.

Talk to a Phase Converter Engineer

📞 800-417-6568

Free sizing help • Lifetime warranty • Made in USA • Mon–Fri 7AM–5PM MST

Sunday,Monday,Tuesday,Wednesday,Thursday,Friday,Saturday
January,February,March,April,May,June,July,August,September,October,November,December
Not enough items available. Only [max] left.
Add to WishlistBrowse WishlistRemove Wishlist
Shopping cart

Your cart is empty.

Return To Shop

Add Order Note Edit Order Note
Estimate Shipping
Add A Coupon

Estimate Shipping

Add A Coupon

Coupon code will work on checkout page

Call an Expert
Call Us
Contact Us