For many shop owners, the leap from hobbyist equipment to industrial-grade machinery is often stalled by a single, invisible barrier: power. You find the perfect CNC mill, a heavy-duty lathe, or a commercial-grade air compressor, only to realize your shop is wired for 220V single-phase power, while the equipment demands 220V three-phase.
Understanding a 220v 3 phase wiring diagram and knowing how to implement a phase converter wiring diagram is the key to unlocking the full potential of your workspace. At Phoenix Phase Converters, we specialize in bridging this gap with American-made technology that is designed to be as reliable as the machines they power. In this guide, we will break down the technical concepts, safety protocols, and step-by-step instructions needed to get your three-phase equipment up and running.
Understanding the Basics: What is 220V 3-Phase?
In a standard residential or light commercial setting, you likely have single-phase power. This consists of two hot wires and a ground (and sometimes a neutral). While this is sufficient for lights, appliances, and small power tools, it lacks the consistent torque and efficiency required by industrial motors.
A three-phase 220V system utilizes three power conductors (traditionally labeled L1, L2, and L3). The voltage in these conductors is offset by 120 degrees. This "overlap" means that power is never at zero; there is always a constant, smooth delivery of energy to the motor.
- Line-to-Line Voltage: Approximately 220V to 240V between any two phases.
- Line-to-Neutral Voltage: Approximately 120V to 127V between any phase and the neutral wire.
When you don't have true utility three-phase power, a rotary phase converter acts as your own personal power plant, taking your 220V single-phase input and "manufacturing" the third leg of power.
The Components of a Phase Converter Wiring Diagram
Before we pick up the screwdriver, it is essential to understand what is happening inside the "black box" of a phase converter system. A Phoenix Phase Converter typically consists of a control panel and an idler motor.
1. The Control Panel
This is the "brain" of the operation. It houses the capacitors and potential relays that manage the start-up and balancing of the electricity. Our panels feature CNC-grade components to ensure the voltage remains balanced across all three legs, which is critical for sensitive electronics.
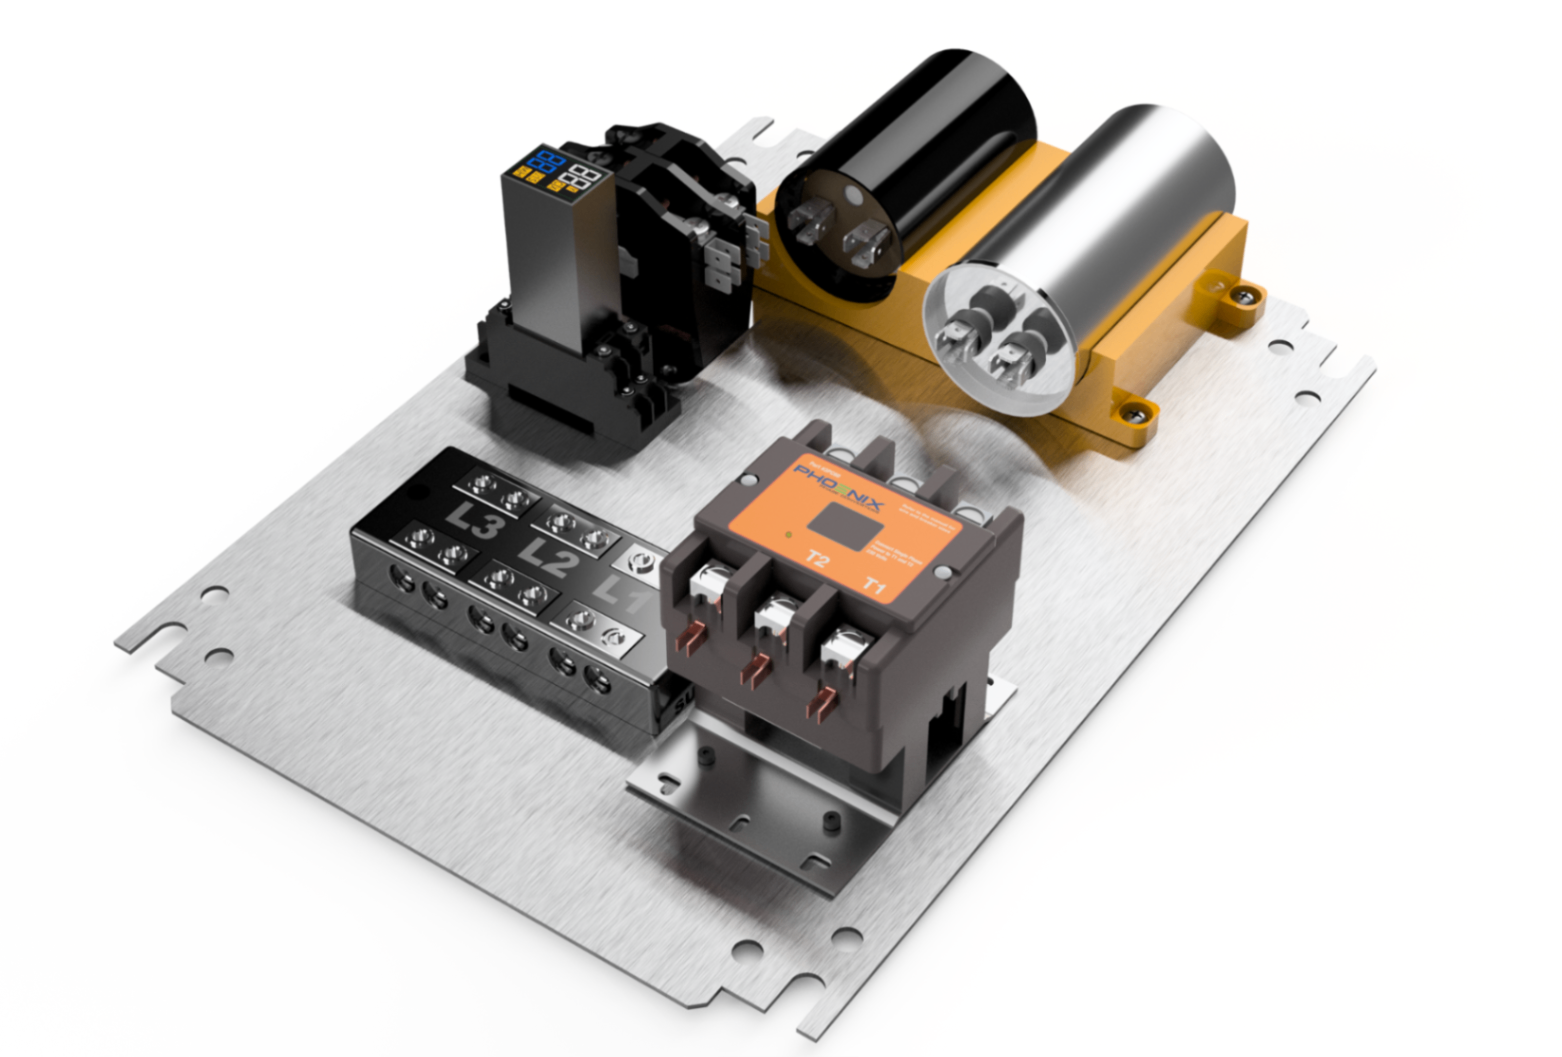
2. The Idler Motor
Unlike a standard motor that drives a load (like a saw blade), the idler motor's job is to spin and use its magnetic fields to generate the third leg of power (L3).
3. Protection and Distribution
The wiring diagram will always include a dedicated circuit breaker on your main single-phase panel and potentially a magnetic starter or disconnect for the machinery itself.
Step-by-Step Guide: Wiring Your 220V Phase Converter
Wiring a phase converter might seem daunting, but we design our units with ease of use in mind. Whether you are an electrician or a knowledgeable shop owner, following these steps will ensure a safe and efficient installation.
Step 1: Preparation and Safety
Safety is non-negotiable. Before beginning, ensure the main power is turned off at the breaker. Use a high-quality voltage tester to confirm that no live current is present. Ensure you have the correct wire gauge for your specific HP (Horsepower) requirements.
Step 2: The Single-Phase Input (L1 and L2)
Your phase converter needs a 220V single-phase feed. This comes from a two-pole breaker in your main electrical panel.
- Run two hot wires (usually black and red) and a ground wire to the "Single Phase Input" terminals on the Phoenix control panel.
- These are typically labeled L1 and L2.
Step 3: Connecting the Idler Motor
The idler motor is what creates that crucial third leg.
- Connect the wires from the control panel terminals labeled for the idler motor to the corresponding leads on the idler motor itself.
- In most 220V configurations, this will follow a standard 9-lead or 6-lead motor configuration (which we will detail later in this guide).
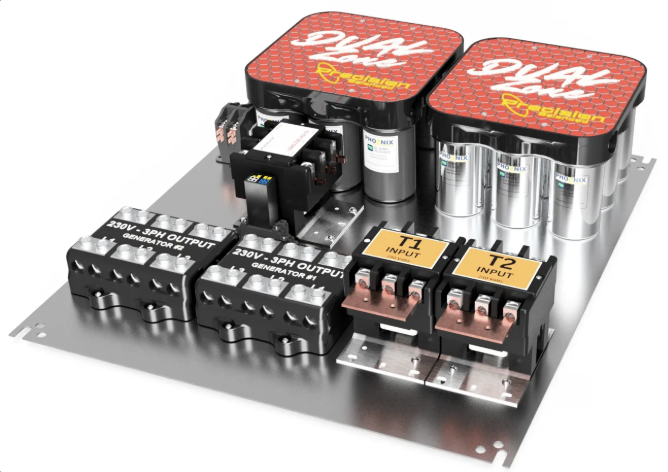
Step 4: The Three-Phase Output (L1, L2, and L3)
Now that the idler is connected, the panel will provide three-phase output.
- The output terminals will be labeled L1, L2, and L3 (or T1, T2, T3).
- L1 and L2 are your "pass-through" legs from the utility.
- L3 is the "manufactured leg" or "generated leg."
- Run these three wires plus a ground to your equipment or a three-phase distribution sub-panel.

Specific Motor Wiring Configurations
When you look at the 220v 3 phase wiring diagram for your actual equipment motor, you may see a confusing array of numbered leads. Most industrial motors are dual-voltage (230/460V), and you must wire them correctly for 220V (low voltage).
9-Lead Motors (Low Voltage/230V)
This is the most common configuration for American industrial motors. For 220V, you want a "Parallel Wye" or "Parallel Delta" connection:
- L1 connects to T1 and T7
- L2 connects to T2 and T8
- L3 connects to T3 and T9
- T4, T5, and T6 are tied together and insulated (this creates the internal junction).
6-Lead Motors (Low Voltage/230V)
- L1 connects to T1 and T6
- L2 connects to T2 and T4
- L3 connects to T3 and T5
Always refer to the nameplate on your motor. If there is a conflict between a general guide and your motor’s nameplate, always follow the nameplate.
Important Installation Considerations
The "Wild" Leg (L3)
In any phase converter wiring diagram, it is important to remember that L3 is the generated leg. While Phoenix Phase Converters are precision-balanced, L3 will show a different voltage reading to ground than L1 or L2. However, the line-to-line voltage (L1-L2, L2-L3, L1-L3) should be remarkably close.
Pro Tip: Never use L3 (the generated leg) to power the control circuits, lights, or 110V accessories on your machine. Always use L1 or L2 (the utility legs) for single-phase control loads.
Grounding
Grounding is the most critical safety step. Ensure the ground from your main panel is securely bonded to the phase converter panel, the idler motor frame, and the equipment frame. This prevents the metal chassis of your machines from becoming energized in the event of a fault.

Troubleshooting Common Wiring Issues
If you've followed the 220v 3 phase wiring diagram and your motor isn't performing correctly, check these three common issues:
- Motor Spins Backward: If your machine is rotating in the wrong direction, simply swap any two of the three-phase output wires (e.g., swap L1 and L3). This reverses the phase sequence and changes the motor direction.
- Motor "Hums" but Doesn't Start: This often indicates a blown fuse in the control panel or a loose connection on the L3 manufactured leg. Check all terminal blocks to ensure they are torqued properly.
- Voltage Imbalance: If your voltages are significantly different under load, you may have undersized the wire for the distance of the run. Check our transformers collection if you need to step voltage up or down to compensate for long-distance drops.
Why Phoenix Phase Converters?
When you are looking at a phase converter wiring diagram, you want to know that the hardware behind the drawing is built to last. Phoenix Phase Converters are manufactured in the USA with a commitment to quality that is rare in today’s market.
- CNC Grade: Our converters are designed to produce power clean enough for the most sensitive CNC equipment.
- Ease of Install: Our terminal blocks are clearly labeled and accessible, making the wiring process straightforward for any professional or experienced DIYer.
- Durability: We use heavy-duty components that can withstand the dust and vibrations of a working shop.
Whether you need a custom panel or a complete rotary system, we provide the support you need to get it right the first time.
Conclusion
Wiring a 220V three-phase system doesn't have to be a mystery. By understanding the relationship between the utility phases and the manufactured leg, and by following a clear 220v 3 phase wiring diagram, you can safely bring industrial power to any location.
If you have questions about sizing your converter or need help interpreting a specific motor's wiring, our team is here to help. Check out our Help and Support page for more technical resources, or browse our full store to find the perfect power solution for your shop.
Don't let power limitations hold your business back. With the right wiring and a Phoenix Phase Converter, you're ready to tackle any job.
Need a Phase Converter for Your Shop?
Phoenix Phase Converters builds American-made rotary phase converters from 2 HP to 100 HP, backed by a lifetime warranty and over 50 years of engineering experience. Every phase converter ships in a NEMA 4 enclosure with a TEFC cast-iron idler — standard, not an upgrade.
Free sizing help: Call 800-417-6568 or browse our rotary phase converter lineup.
U.S. Patented · Lifetime Warranty · Family-Owned · Built in Arizona